
Hi guys,
It has been a while...Hope everyone is doing well for the upcoming Christmas.
Here is a copy of my experience building the Multi-Chine Skin on frame (wood and PVC cloth) Sea Pup.
Original post here (which has links to larger pictures, a few extra pics): https://www.trailcafe.com/article/2018/Building_a_Multi-Chine_Tom_Yost_PVC_Skin_on_Wood_Frame_Kayak-18-20-25-Nov-2018/Building_a_Multi-Chine_Tom_Yost_PVC_Skin_on_Wood_Frame_Kayak.html
---------------------------
Step 1 pick a kayak:
That is pretty easy, we liked the Sea Flea that she used before, a design by Tom Yost. I was surprised and disappointed to find that his web site yostwerks.com is no more. However someone from the old building forums (That would be this form-the ole green version) has set up a mirror of an old version of his site at yostwerks.org. Anyways the build we chose is the multi-chin sea pup. The only design modification was to move the gunwales up two more cm. This build is for a non-collapsible wood frame.
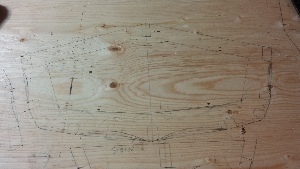
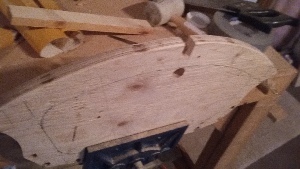
CREATING THE FORMS/STATIONS:
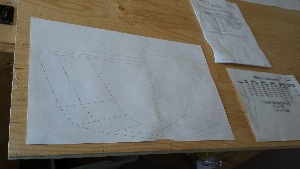
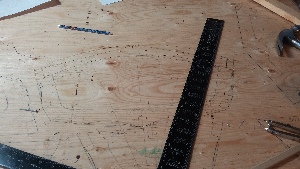
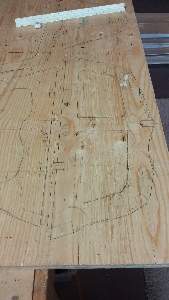
The plans shown are printed with libre cad, which I found a bit easier to use, than drawing them directly on the ply wood. I can print on 11x17 at work. The Software is a bit odd, if you've not used it before. There is one error on the plot shown, the station at the front of the combing is actual arched,not peaked.
It takes a couple of hours to transfer the points to the plywood, and draw the station details out. to do nails are driven through the drawing at each lines intersection point for one half of the printed form. After that the paper is flipped over, aligned by placing the nails at the keel and deck ridge back in place, and nailing through to the plywood in the holes just made.
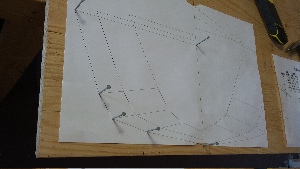
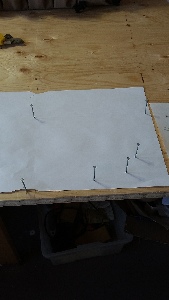
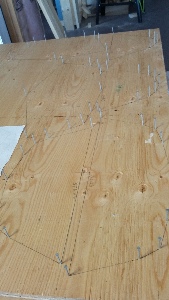
I mark the keel, chines, and stringers using templates cut from cereal box cardboard.
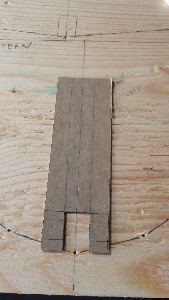
After that marking the inner lines, and fixing the station at the front of the cockpit so it is an arch rather than a point.
Initially I made the stations quite beefy that is overly thick between outer edge and inner edge, leaving little room for the legs to fit through the main station, as well as access the rear compartment. I then spent a fair bit of time fixing that. One change I made was to run a vertical riser on the center of my station, There is another website by Terry Reed for a different Tom Yost design which does the same thing... so if two people came up with it then more of a chance it is a good Idea. That website http://lightweightboatbuilding.com/stIntro.html, is a fantastic site, which I read part way through my build, and I more or less used his technique for building the cockpit combing.
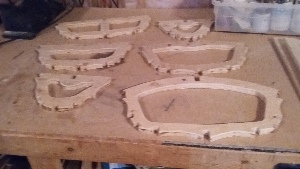
Cutting the outside of the stations I use a band saw. I drill out the cut-outs/notches and use a pull saw and a coping saw, followed by sanding with heavy (80) grit sand paper when the cut out was too tight to fit a cutting of a stringer/keel/gunwale. I did try to use the band saw but the blade is thin and it really tended to wander. Plus the noise and the dust and the wife complaining about it convinced me to switch to the hand tools. It took around 2 hrs.
Cutting out the inside of the station with the jig saw (outside on the patio) highlighted to me how dull my band saw is. The Jig-saw cut well, but the bevel guide does not tighten, and it is prone to shift if not paying attention.
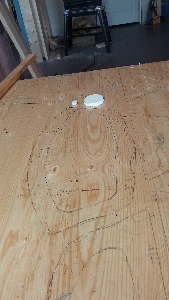
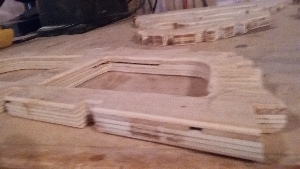
I bought std outdoor 3/4" ply for the stations, I picked a 4x4 sheet, which had few voids showing on the edge. There stations did wind up with some voids in the lamination. I have some thin cuttings left over from ripping spruce 2x4s, which I plane down to a 1/8th thickness and glue (tightbond III) into the voids.
The trick is to take some thing pointy and narrow (like a finishing nail) and feel out the shape of the void. I used a small drill bit. There seems to be two types of voids: round ones where a knot has broken away, and long narrow ones where the layer of ply seems to have split and shifted. With the narrow width of the stations it works quite well, I think I got all the voids filled. I was not planning on doing this, which is part of the reason I bought 3/4 plywood, I think I could have used 1/2 ply given the act of filling the voids.
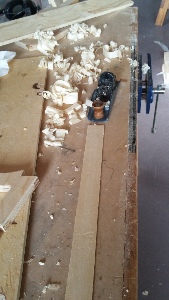
STRONG BACK:
The strong back is built according to Tom's instructions. The only note here is the lumber was a bit off in width from each other. I kept the top flush when screwing the boards together, but when it was done it rocked while sitting on the saw horses. This is quickly fixed with the plane, leveling out in the spots that rest on the saw horses under. I like this strong back, for this application, quick and inexpensive to build and good enough. However if using the same style for something like a cedar strip canoe, I'd widen it with 2x4 spacers, and run perpendicular "booms" out from the bottom, at the point where the saw horses sit, and the screw a top piece over the back of the saw horse.
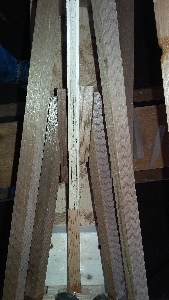
STRINGERS:
Stringers: I bought some very expensive 15' very clear strait grained and sanded cedar (1' longer than the kayak) for stringers from the Cedar Shop in Calgary. So I could cut them full length (did I mention expensive). On the previous Sea flea build I used fence boards with scarf joints, with epoxy glue and had a failure during the build. Possibly due to starve out but I don't think so, I only had a 4:1 or so scarf. Even so I was surprised when it failed. Next time I will again use scarf joints, but re-enforce with a fiberglass wrap, and use a better ratio for the angle of the cut. As I have the fiberglass and epoxy on hand that will save me around $150, at the cost of an extra couple hours or so work.
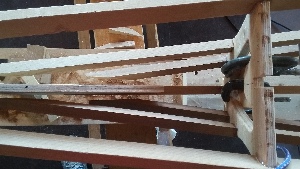
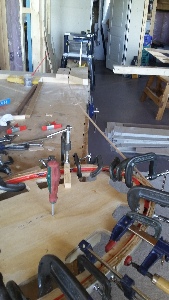
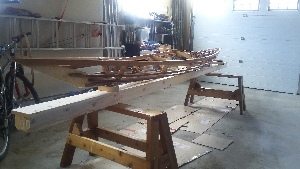
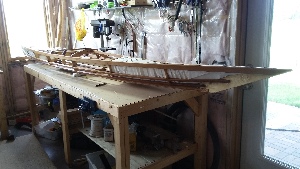
BUILDING THE FRAME:
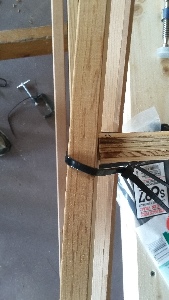
I mount the two end stations as per Tom' instructions, with the bracket design he suggests on his site. However the chine closest to the center line is too tight to install with the kayak right side up. I think this could be overcome with a differently shaped bracket, one that goes wide out the sides and comes in between the Chine and gunwale. However I simply did not put that stringer in place until after all the other stringers/gunwales/Keel were glued up, and I could flip the frame over. This worked well enough, although it effectively added a day to the build (waiting for the epoxy to dry).
One other point is that with the 3/4" thick plywood instead of 1/2" the slots for the stringers really could use a bevel, especially at the stations near the end.
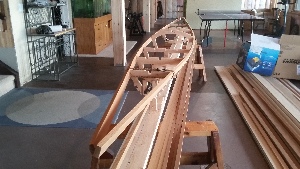
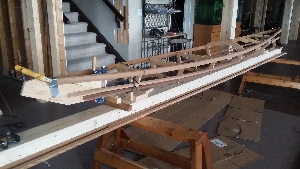
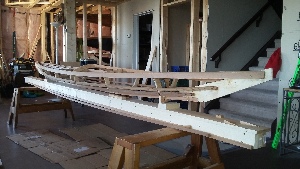
With the gunwales and the keel tie strapped in place this is starting to look like a (very nice - according to me) kayak.
Next morning just puttzed around getting two chines in place. I had to re-size a few holes. When I was using the bench sander to clean up the outside edges of the stations, I had the misfortune of catching the belt on a sharp edge of the station and tearing it off the base. This turned out to be a blessing in disguise, with the belt on a strip of 1/2 ply it worked well for tweaking the slots, The Belt on its own when pulled back and forth between the gunwale and the station quickly beveled down the station. That is with the gunwale held in place at the ends, and pinching the sanding belt down into place on the station.
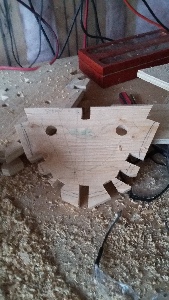
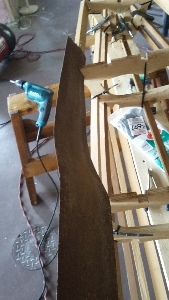
Cutting the end stations was a exercise in frustration. I tried to shape it up directly on the wood, which was difficult and failed the first time, the second one went smoother when I used a cardboard sheet cut out from a box. To add injury to insult, I had my first kickback incident on my table saw (in decades of using it) which caught me right in the nuts, this hurt, but no lasting damage, so not that bad. It did however wrecked my piece with the last cut I was making on it.I traced it out and re-cut it with my skill saw (and table where I could use the fence or miter gauge). Only to find the keel was not up when I made the template... when I moved the keel into proper position, the end piece did not fit. (sigh).
All of the fitting of the end pieces and the stringers to them was done with the stringers held in place with zip ties and friction. I finally had a good fit, or so I thought, but realized one stringer was not fully set into its slot in the last station, with the bottom edge twisted out. This gibbled my end cut on the stringer. So I decided I should screw and glued the gunwale and stringers to the center 4 stations (but not the last two). The hope was that they will not twist around so much.
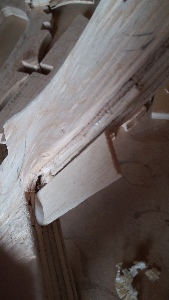
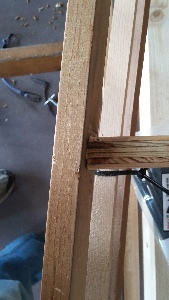
In setting up to to do that I realized one of the station to gunwale joints really opened up due to the angle of approach of the gunwale to the station vs. The cut for it being a 90 degree on the bottom of the slot . It was more than I could handle.
As mentioned, when I was using my bench top belt sander a week earlier to clean up the stations. It had torn the belt, so i cut it off and had a 2.5' long piece of 60 grit sand belt. With the end of the gunwales pinched together I got lots of pressure on the area I was sanding, and it made quick work of reshaping the joint. With a little effort it is now a pretty good fit, if I kept at it for two minutes it would be a perfect fit. So a I think a good tip, I'm keeping my strip of belt for sure.
With that done I glued in the gunwales and the two chines to the four center stations. Remember I can not fit one chine as there is not enough room to get past the cleat holding the front of the kayak to the strong back, so I'll have to do that later.
Next day I glued the gunwales at the one end station and glued in the keel to all stations. I only get short bursts of time to work on the kayak during the week.
I got a good six hours in on Saturday. I've rough cut the 2nd end piece, and beveled the gunwales and stringers. This took way longer than I thought it would, as always. Making the horizontal cut on the stringer so that it will make a nice joint to the end piece requires a bit of visualisation. Cutting the stringer parallel to the end piece is not the right answer. As it bends inward the angel opens up to the back of the cut by slightly less than the distance the parallel cut was made from the form. The gunwales needed an extra 3/16ths taken off the front to get the proper angle. The lower stringer about a 1/2 inch. A simple jig of a piece of wood about the length of the cut, with a 3/16ths block taped at the end worked pretty good for marking the line. For the stringers I moved the position of the taped on block. That got me close, Then I made good use of the 80 grit sanding belt I mentioned earlier.
It is pretty apparent I cut the bow stringers too short... It is going to be difficult getting the lowest stringer installed... Perhaps my mistake will help you make sure you cut yours long enough. I can force the stringer to the end piece, so I can make due. Before gluing the stringers to the end piece, I've got to let the keel glue joint set.
The following day it was clear that I've definitely cut them short! Dry fitting the stringer to the end piece when it was not glued into the last station worked, but only just. That day I glued and screwed the chine stringer to the last station, then called it a day. On trying to glue to the end station a couple of days later it was clear there was no way one of the stringer pairs would fit. The issue is that prior to gluing and screwing the chine in place the stringer had flexed out of the last station a 1/4 inch or so, so I could bend it all the way from the 2nd last station. With the re-curve between at the end of the kayak on the water line, screwing and gluing the stringer in place in the last station pulled it out from the end piece another 1/2 inch or so. Had I screwed the chine into the station and then tried to fit to the end piece I would have realized I should (could) have cut the station notch a bit deeper and over come the issue with cutting too short to begin with. The point is if you are going to glue the stations before the doing the ends leave lots of extra length... When I made the original cut I though I'd left lots. Perhaps screw the stringers/chines in place (no glue) for shaping of the ends, this way if they are short, you can remove them and deepen the notch in the last station. (I had thick stations so could have done so without making them too weak).
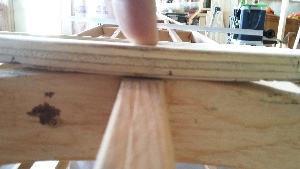
What I did do to fix the issue, was to place a block of wood between the stringer and the end piece.
The stringers closest to the keel will now go on with the kayak up right. This on went on well. Once again I made good use of the belt from the belt sander.
BUILDING THE COMBING.
As mentioned much of this is based on Terry Reed's site.
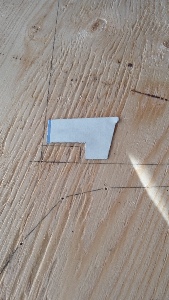
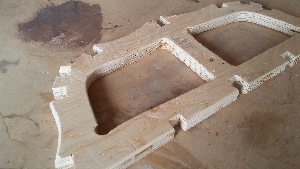
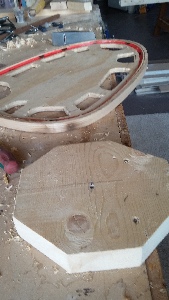
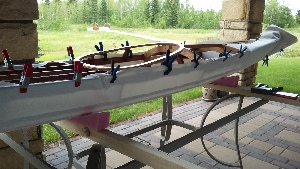
Building the combing took a full day and a bit. I had some left over 1/8th of an inch thick ash strips from when I re-did my canoe gunwales last spring... I've had them sitting in my basement thinking I could used them for something, but with no planned project. They are pretty much perfect for building a combing. So I cut the combing base, as per Tom's instructions, but with my own cockpit template. With the inner leftover section I made a form for making the combing itself.
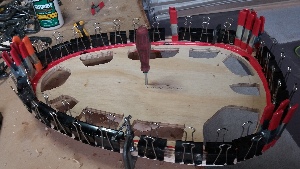
To complete the jig for the coming, I made a base on which I could spin the combing form, The base is a bit of 2x8 I had kicking around. I drilled a 1/4" hole more or less in the center of both, and with the base screwed to my work bench and a screwdriver holding the two together, it would rotate. I also Jerry rigged a feeder, thus way I could clamp and spin the combing form, with the 12 or so foot long strip feeding in from a single direction. It worked fairly well. It still took me several hours to do the combing, and that was with Tightbond-III glue and not epoxy (It sets up faster).
I had to (choose to) use a heat gun to bend the ash strips around the tighter corners. I should have used it more consistently, as I did get a bit of breakage. I also managed to get some burn marks where I held the gun too close too long. It is worth practicing if you have some extra wood (it is hard to sand the burn marks out). The trick is to go by feel, have some pressure on the wood to make the bend, as you feel the pressure give way as the heat makes the wood pliable, move on. Also if you can get some compression it should help prevent splintering. I learned that after the fact, but have not used it myself... so your mileage may vary.
The rough combing turned out okay, not great but good enough. I decide to fill in a few spots with epoxy mixed with fairing filler after the first rough sanding. The issues being tearout from the plane, and a failure to keep the strips at an even height when they were gluing up. Actually once it was sanded, filled and coated with epoxy it looks pretty good. Although I did not get the burn marks out on the one corner of the combing riser.
INSTALLING THE COMBING:
Install combing base (not really necessary if your combing is strong enough, and I think this one is for the intended paddler). Tom's instructions call for a combing base to be installed to the kayak frame, then layers of plywood on top of it to buildup to build up the combing itself. The kayak skin goes between the combing base with the combing then bolted (or screwed) down to hold the skin sandwiched between the two. I followed these instructions as I build the frame, including installing the combing base and placing two stanchions to support the combing on each side. I however used different method to affix the skin to the frame at the combing, this method I think would change the way the frame can be built.
The laminated combing I build, with Ash is quite strong, I think I could get away with out the combing base being installed. The method is to glue and dowel the combing in place as per Tom's instructions for the base, and then use 1/4 ply cut to the same shape as traced from the combing, underneath which is screwed up into the combing holding the skin in between. I got this from another build log years ago when I build the sea flea, but I can no longer find it to reference. I'd forgotten while I was building this frame 10yrs later, and by the time I "remembered" I already had my combing base installed. The benefit of the suggested change is that the skin does not have to transition so hard up above the combing base and will have fewer wrinkles. Plus it is slightly lighter kayak
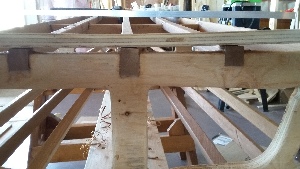
If you are installing a plywood combing base as I show above, the base will again have an angle to it at the back. Notching the top stringers at the back of the cockpit area with a bevel allows the combing to sit flush. Also bevel the station where the combing sits at the front. The combing base is the glued and doweled into place front and back. The same beveling procedure would go if you are installing the combing directly on the frame.
SEALING THE FRAME:The frame is sealed as per Tom's instructions: two coats of epoxy on all plywood edges, and a single coat on plywood flat surfaces. I used several coats of Tung oil to do the stringers.
FLOATATION:
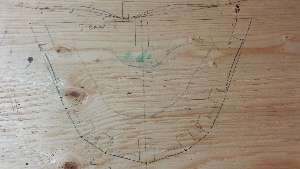
I've opted to put in hard floatation at both the bow and stern. This consists of glued up Styrofoam sheets between the 1st and 2nd station, and the 5th and 6th station the process is as follows:
1) Cut a piece of Styrofoam to the shape of the smaller of the stations in the area being filled, but remove a 1/4 ths of inch or so to allow the fabric to fold inwards. You still have the paper drawings right? Use that to transfer the station to the Styrofoam. Cut the Styrofoam with a bevel to match the shape of the hull at that point. Just eyeball it.
2) Cut out the notches required to allow it to wedge into place
3) Place the station in place. Slide it in sideways and twist it into position. Mark any miss cuts on the foam. I marked a line at each corner, and made the length equal to any differences I needed to add to the next piece
4) take the station out and use it to draw the next one, using the marks to adjust the size accordingly.
5) glue the foam into place.
6) repeat.
But... make sure you put the other end piece, at the larger station in place before you get too far along. (You'll see why you need to other wise start at the small side, as it is much easier. You need to put this piece in sooner rather than later, as eventually the gap is closed, and you can not slide the piece in side ways. At this point you need to cut the foam to get it into place. The very last piece slides in as fairly small slivers... If I remember right about 1/3 of a piece at a time.
The end sections, I actually found went in better lengthwise. I used qty 5, 2'x4' sheets of 1-1/2" Styrofoam.
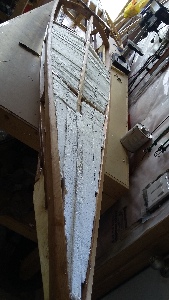
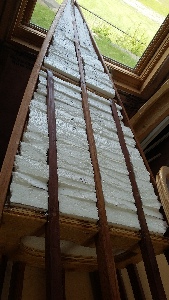
The floatation is below the lines of the chines and stringers to allow the fabric to sit flat. I've also left the chamber behind the cockpit without floatation so that a lunch and the like can be stored there.
SKINNING THE HULL:
Skinning is done outside and while wearing a charcoal filtered face mask, and rubber gloves, the PVC glue is quite toxic.
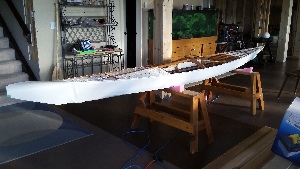
Skinning the hull for the most part was strait form Toms Web site. The main differences are how I finished the ends (a minor diff), and how I did the cockpit. I think that I'd do even more differently next time. Most people on the Web these days seem to use nylon or polyester, with a painted on coating to water proof it. This does appeal to me. I however have some leftover 18 oz PVC coated nylon/polyester. I'm not sure which. Or at least so I though. I'd forgotten on the black I'd cut 4 feet off and now it is too short. So having bought some blue also need to buy some white. I bought for 1/2 the price it was being sold at fabric land from:
PacCana Enterprises Ltd
Calgary, AB
(403) 291-3633
One mistake I made was I checked the blue out prior to purchase, and made sure it was what I wanted, I then pointed at the white and said ' I'll take 15' of that too. Only when I got home did I realize that it was different stuff. It is PVC coated, but the cloth inside is not woven and lighter. Probably easier to cut or tear.
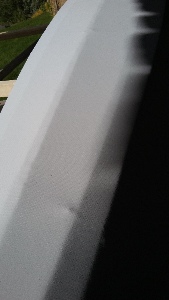
The lump is due to epoxy drips when sealing the frame, which I should have filed off, but had failed to notice until tool late. I'll be running the blue PVC cloth over the chines, so hopefully they do not wear through, resulting in a leak in the boat.
Skinning the multi chine hull is straight for Tom Yost's Web site. If I was doing it with the same material again I'd consider first sheathing the bottom to both chines with a single piece, then the sides with a second piece, and finally the deck. This is to avoid the winkle on the side. But that would use more of the nasty HH66 vinyl cement glue... and risk the possibly a weak seam under the waterline (although the glue states it is stronger than the PVC, but wood glue makes the same (false in my opinion) claim. But more likely I'd go with the polyester skin.
The kayak has a bit of a blunt nose, and I wrap the ends a bit differently from what Tom does, due to the shape of the end, a simple slit at the corners, then fold the bottom up (stapled), and the sides around (glued).
SKINNING THE DECK:
Again I mostly followed Tom's method.
Here I would me one change to skinning the deck: I'd run the cloth a few inches into the cockpit area, and not stop right at the edge of station the combing rests on. This is to better support the main change in the skinning procedure, which is for the clock pit area described below.
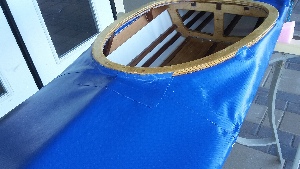
SKINNING THE COCKPIT AREA:
The recommendation for the main change to the cockpit has two variations. If you have a hardwood laminated cockpit combing that is strong enough on its own (with stanchions as required) then I would forgo the combing base Tom uses. Plywood combing without re-enforcement does not fit this "strong enough" description. In this case the base is installed to the frame as per Toms instructions. I refer to this setup cockpit/cockpit base to try and cover both options when describing the cockpit skinning.

The skinning difference come with the way the skin is attached to the cockpit. Instead of skinning over the base the skin runs under (where it can). Where it cannot a cut is made and it runs strait up the combing riser/edge of the combing base. The portions that run under are then held in place with a 1/4 inch of ply cut to the shape of the combing/combing base used as a "washer", with screws into it from the bottom. It reply helps to have the holes pre-drilled, and you will need a stubby screwdriver to reach into the kayak to crank them in.
I found that the triangle shaped cuttings of cloth from the end of the kayak fit nicely to fill in the sides of the cockpit, but I did not have much width to spare. So don't leave too much extra slack running down the side of the kayak when trimming off the deck... but not too short either so it can be glued down. Anyways I taped these pieces with duct tape on the under side at the front and back, and temporarily on the gunwales. Then using a finishing nail I marked where the cuts needed to be made for the small sections that need to go up the side of the cockpit where the stanchions are. With that a cut strait down to these points, and the cloth then fits under the combing/combing base and held in place with the fit to cut 1/4 ply pieces which are clamped tight.
Trying to use a finishing nail to poke a hole through the cloth gives a really good feel for just how strong it is.
Using Duct tape to temporarily hold the side piece in place, it can now have the front, back and sides cut so they overlap the existing material by an inch. The front deck, rear deck and hull are masked off, sanded and the HH66 vinyl cement applied to top and bottom. After the cement is dried the folds are allowed to overlap, and a heat gun is used to re-activate the glue. Then remove the duct tape, and glue those areas, and repeat for the other side of the cockpit.
The final bit of work is to "patch" the areas at the front, back and where the stanchions are. A narrow strip is placed over the points where they cloth transitions from under the combing to up the side. At the front and rear there may be multiple strips to account for the curve of the cockpit base/riser. Each side of strip runs along the top side of the combing and overlaps the deck by an inch, and is glued to both PVC and the wood with the HH66 Vinyl cement.
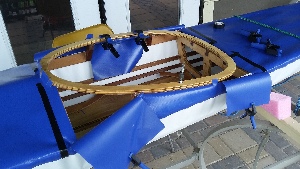
INSTALL THE COMBING:
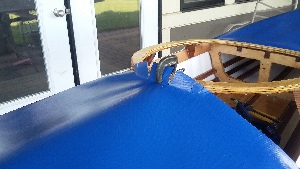
Following Toms instructions there is the combing base attached to the frame already. To this our combing is attached by screwing up through the base. In my case I had two stanchions on each side of the cockpit. I had three holes pre drill through the cockpit in each section between them. I marked through these to mark both my combing, and the 1/4 inch ply 'washers'. The two outer holes in each section are used to screw the washers to the combing base, holding the kayak cloth in between. The center hole is used to screw through the 1/4 ply, the 1/2 ply combing base, and into the cockpit, keeping it all together.
A bit of (yet to be applied) calking between the combing and the cloth will seal that nicely.
One minor mistake I made, Tom shows where to place the staples for the bow and stern portions of the decking. Use those! I added some extra staples closer to the combing, Which looks good when you just have the end pieces in place, however it results in some deformation/wrinkles in the cloth after I glued in the cockpit side pieces to it. This results as they are forced out of the natural lay down of the cloth.
Note in the above the cockpit combing is not in place, only the base plate. it does clean up nicely once it is screwed into place.
the cockpit floor is 1/4 marine grade plywood (with spar vanish), affixed per Tom yost, using Aluminum angle brackets to hold in place.
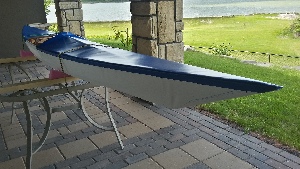
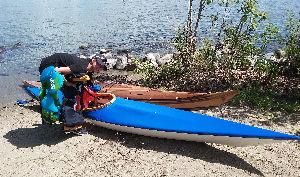
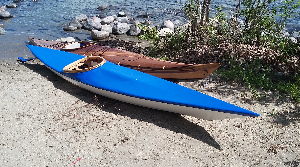
FIRST PADDLE:
The first paddle is at Sylvan Lake, in central Alberta. We are out for two hours or so. The boat got a few shrikes out of my girl, but never capsized. The water was reasonably calm, but for the odd wake from motor boats going by. Dana has been out a few times for short paddles in the smaller sea flea, although only on very calm water, so she is somewhat used to the narrower boat. (never tipped that one either).
I'm pleased with it. (The hybrid is Nick's Guillemot S&G hull with cedar strip deck, built a long time ago)
STILL TODO:
I want to run deck lines, and bungee cords. I'm not sure if I'll screw a loop or either nylon webbing to the gunwales to support the lines, or if I'll just glue a loop of PVC cloth. Probably the latter to avoid water getting into my nice sealed frame.
Also I'm going to add wear strips along the keel, chines, and at the bow and sterns on the hull. This is because the white cloth is not as robust as the blue. I'll simply glue the left over blue strips in place.