

Boat Building Forum
Find advice on all aspects of building your own kayak, canoe or any lightweight boats

Date: 1/7/2011, 1:17 pm
: For some one new to fiberglassing, YES. Wait about 12 hours until
: the epoxy isn't tacky any more. It should still be
: "green" and slightly soft. Scrape off any ridges and
: or bumps (ie bugs or dust nibs). Don't try to sand it. Your
: 'glass will slide on top fine.
: A much more advanced method is to roll on a coat of epoxy, wait for
: it to get slightly tacky (usually a couple of hours with fast
: hardener), lay your 'glass on and immediately start 'glassing.
: You want it tacky so that it holds the 'glass in place. It works
: really well on interiors and is also a way to reduce resin usage
: for light builds. I often use it when casting parts that have a
: clear epoxy gel coat. One big warning: It can also be a royal
: PITA!
Being a newbie here, I am somewhat reluctant to step in. However, my experience and information suggests that pre-coating the wood is unnecessary and could be counterproductive. I just finished glassing my hull, and had no problems whatever putting the glass on bare wood. The experts at Mas epoxy state that pre-coating is not necessary with the cloth weights we use for kayaks. I suppose that this advice might be less applicable to heavier (for kayaks) S-glass which is somewhat harder to soak, but others will have to wade in on this as I have no experience. I was using the 3.25 oz E-glass from Thayercraft, and had no trouble wetting it out with Mas epoxy mixed about 75% slow and 25% fast hardener.
Putting the glass on directly avoids a step in the process. Also, if you have been careful with your sanding, the smooth clean surface will not have any hidden snags to grab the weave of your cloth.
There are numerous sources of information on the topic, but this is what worked for me.
1. Sand and clean the hull. I wiped it down with a rag dampened with isopropyl alcohol (as per the experts at Mas) the night before glassing to remove the last bit of dust. Do not use paint thinner or acetone.
1b. (optional) Place masking tape along the line at which you wish to trim the glass if you are going to trim it short of the edge of the wood. I left the edge of my hull bare so I could leave one line of staples in place until the deck strips were glued in place. (see my earlier post on tidy fiberglass edges if you are interested.)
2. Preheat the shop to a warm temperature, I did my work at about 77 degrees F. Do this well ahead of time so that everything is up to temperature. I warmed the shop overnight before doing the glassing the following day. I have read that some builders let the temperature of the shop decline slightly during epoxy curing so as to avoid bubbles being generated by air pockets in the wood, but I did not bother with this and had no bubbles. Warmer temperatures reduce the viscosity of the epoxy, and make wet out of the laminate more effective.
3. Roll, don't drag the glass onto the bare hull. Use clean rubber or plastic gloves to keep finger oil off your glass.
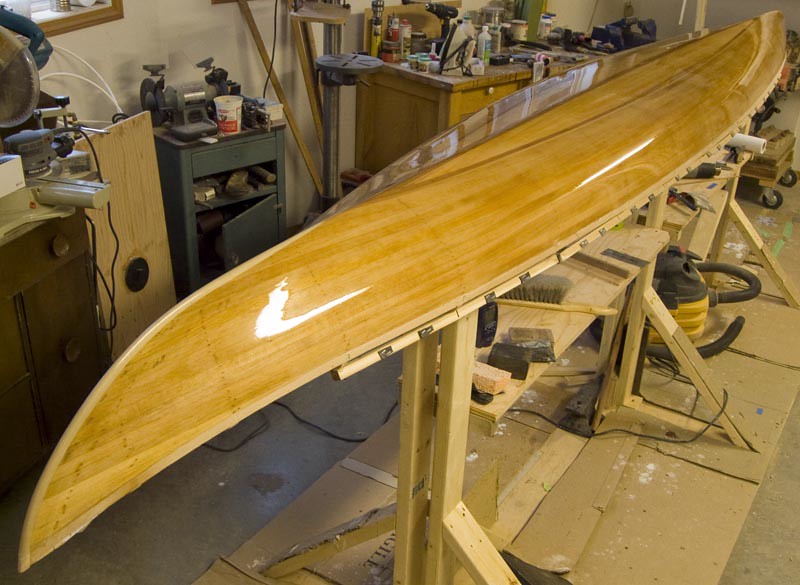
4. Use a clean soft paint brush, not your hands, to gently smooth the glass into place. It should lie perfectly smoothly over the entire surface, with the possible exception of the stems, depending on their curvature and the looseness of the glass you are using. Getting the glass on tight and smooth at this point will help avoid wrinkling when you squeegie later. Don't worry about it if the glass will not lie perfectly on the stems. You can trim the glass just short of the portion of the stems which will not behave themselves. Don't bother trying to fold the glass over the stems either. Later, you will want to apply some bias cut cloth over the stems to reinforce them anyway, and the bias cut cloth will hug the surface of the stems perfectly. The stem in the photo has the hull glass trimmed slightly short of the stem, and up to five layers of 3.25 oz cloth over it.
5. Measure and mix your epoxy carefully, about six ounces or so per batch if using a slow hardener. Mas recommends mixing for at least two minutes (time it to see how long this really is). With the Mas epoxy I was using, I did not worry at all about bubbles during mixing. They do not persist through the glassing process. Other epoxies might be different, but I would expect that any low viscosity epoxy would work similarly.
6. Apply the epoxy by pouring on a small puddle and spreading it around with a roller or brush. If you use a roller, make sure that it is compatible with epoxy before you try it on your boat. Otherwise, you could end up with a boat decorated with bits of disintegrating roller cover. What you apply the epoxy with is not all that important to the end result. The main point on your first attempt is to make sure that you apply enough epoxy to soak both the glass and the wood. Soaking takes a few minutes, so don't worry if the epoxy does not wet through right away. Just keep going, and monitor what you have done to see how it behaves. Apply more epoxy as necessary to any spots that seem to need it. You will probably waste a bit until you get used to how much is required, but this is better than not using enough. Don't worry about bubbles at thus stage, they will disappear later. IMPORTANT: If the epoxy you are using starts to heat up in your mixing cup while you are glassing, toss it and make a smaller batch next time. Once the epoxy in the cup goes exothermic, it may not stay liquid enough for long enough to properly wet the glass out.
7. Now for the bit that counts. After you have applied epoxy over some distance of hull (I actually did one whole side at a time, but my epoxy is quite slow, and the boat is small), you need to squeegie off the excess. Not all squeegies are equally effective. The best in my experience are the relatively heavy rubber ones that you can get from a specialist composites shop. The thin plastic ones don't work as well for me.
Whatever squeegie you use, how well you use it will affect the quality of your finish and the weight of your boat - this is more important than the method of putting the epoxy onto the hull in the first place. The idea is to remove all the epoxy that can be readily removed, while leaving the glass tightly adhered to the hull and still filled with epoxy. If you get it right, the resulting laminate will be light and strong, and there will be few runs or drools to clean up later. With properly squeegied glass, you will see the texture of the glass clearly over the entire surface, and the surface will be as fair as the hull underneath. This is more easily seen and experienced than described, but getting all the excess epoxy out takes a bit more pressure and perseverance than I initially expected. Start off with lighter pressure, and work up to fairly firm pressure which fails to remove any more epoxy. Cut a notch in the side of a plastic cup - make the shape similar to the edge of your squeegie. After a squeegie stroke, run your squeegie through the notch to scrape the excess epoxy into the cup. To learn about all this before tackling your boat, it would be a good idea to apply a couple square feet to a scrap of plywood to see how all this works.
8. As you progress, monitor the areas you have squeegied, and if any spots develop that seem starved of epoxy, apply some more, and re-squeegie. With the Mas epoxy I used, and the time I left it before squeegying (is that really a word?), no starved spots developed.
9. Continue to monitor the hull for a few hours after glassing to watch for any trouble before the epoxy to gels. The areas to watch are the stems, but don't worry too much about them. Any glass that lifts near the stem can be trimmed flush to the hull and will be covered by the stem reinforcement later.
10. After the epoxy gels, what you see is what you get. Admire the beauty of what you have produced, and have a beer or maybe even two.
11. Plan on applying extra layers of glass before the first layer is fully cured so as to get a chemical bond. If the epoxy you use blushes, follow the manufacturer's instructions to avoid problems with it.
Messages In This Thread
- Strip: Advice on glassing the hull
Todd O -- 1/6/2011, 10:34 pm- Re: Strip: Advice on glassing the hull
Paul G. Jacobson -- 1/6/2011, 11:53 pm- Re: Strip: Advice on glassing the hull
Bill Hamm -- 1/7/2011, 12:52 am- Re: Strip: Advice on glassing the hull
Dan Caouette (CSFW) -- 1/7/2011, 6:00 am- Re: Strip: Advice on glassing the hull *PIC*
Al Edie -- 1/7/2011, 1:17 pm- Re: Strip: Advice on glassing the hull
Bill Hamm -- 1/7/2011, 2:21 pm
- Re: Strip: Advice on glassing the hull *PIC*
Al Edie -- 1/7/2011, 1:21 pm- Re: Strip: Advice on glassing the hull
Todd O -- 1/7/2011, 2:53 pm- Re: Strip: Advice on glassing the hull
Bill Hamm -- 1/7/2011, 3:42 pm- Re: Strip: Advice on glassing the hull
Paul G. Jacobson -- 1/7/2011, 4:55 pm- Re: Strip: Advice on glassing the hull
Todd O -- 1/8/2011, 3:16 pm
- Re: Strip: Advice on glassing the hull
- Re: Strip: Advice on glassing the hull
- Re: Strip: Advice on glassing the hull
- Re: Strip: Advice on glassing the hull
